Vue2入门学习笔记
Vue2入门必备!
⭐关注我查看更多配套笔记
学习视频:https://www.bilibili.com/video/BV1Zy4y1K7SH/
【尚硅谷Vue全家桶】
本博客是对该视频内容的整理以及加入自己的理解 想全面学习的推荐大家去看原视频
1.基础
1.特点
1.采用组件化模式,提高代码复用率,让代码更好维护
2.声明式编码,让编码人员无需直接操作DOM,提高开发效率
3.使用虚拟DOM + 优秀的Diff算法,尽量复用DOM节点
2.官网内容
官方网址 :cn.vuejs.org
3.下载及安装
1.下载
在官方网址 : 安装 — Vue.js (vuejs.org)
需要配置以下内容:
2.安装开发者工具
一、Chrome浏览器安装方式:
①:点击右上角三个点
②:点击更多工具
③:点击扩展程序
④:点击右上角的开发者模式,将他启用
⑤:将下载的Vue.crx文件直接拖动到浏览器窗口即可
二:Edge浏览器安装方式
①:点击浏览器右上角的三个点
②:点击扩展
③:点击左下角的开发人员模式,将他启用
④:将Vue.crx文件拖动到浏览器即可
https://pan.baidu.com/s/1MtYvMPew4lb14piIrs9x6w
提取码:6666
3.关闭开发者提示
Vue.config.productionTip = false;
2.基础使用
// 非Vue控制的函数尽量写成箭头函数
1.基础Vue全局配置(传参)/使用对象方法
1
2
3
4
5
6
7
8
9
10
11
12
13
14
15
16
17
18
19
20
21
22
23
24
25
26
27
28
29
30
31
32
33
34
35
36
37
38
39
40
| <div id="root">
<h1>你好,{{name}}</h1>
</div>
<div class="root">
<h1>你好,{{name}}</h1>
<h2>现在时间是{{Date.now()}}</h2>
</div>
<script>
x = new Vue({
el:'#root',
data:{
name:'尚硅谷',
}
})
const y = new Vue({
el:'.root',
data:{
name:'尚硅谷'
}
data:fuction(){
console.log('QQQ', this)
return{
name:'尚硅谷'
}
}
}
})
y.$mount('#root')
</script>
|
2.模板语法
1
2
3
4
5
6
7
8
9
10
11
12
13
14
15
16
|
<h1>你好,{{name}}</h1>
<a v-bind:href="url">点我</a>
<a :href="url">点我</a>
|
3.数据绑定
1
2
3
4
5
6
7
8
| <input v-bind:value="url">我是单项绑定
<input v-model:value="url">我是双向绑定
// 绑定后 为js表达式 不绑定为字符串
<input :value="url">我是单项绑定
<input v-model="url">我是双向绑定
|
4.MVVM模型
1.M:模型(Model):对应data中的数据
2.V:视图(View):模板
3.VM:视图模型(ViewModel) : Vue 实例对象心

因此 vm 也经常作为 Vue的实例对象
const vm = new Vue({})
5.vm
1
2
3
4
5
6
7
8
9
|
<h1>
{{ $mount('#root') }}
</h1>
{{name}} 存在是因为会自动添加到 vm 对象中
|
6.进阶技术 Object方法
1
2
3
4
5
6
7
8
9
10
11
12
13
14
15
16
17
18
19
20
21
22
|
Object.defineProperty(对象名,添加的键,添加的值)
Object.defineProperty(obj,keys,{
value:18,
enumerable:true,
writable:true,
configurable:true,
get:function(){
return number;
}
get(){
return number;
}
set(value){
number = value;
}
})
|
7.数据代理
1
2
3
4
5
6
7
8
9
10
11
12
13
14
|
<script>
obj1 = {
x:100,
}
obj2 = {
y:200,
}
Object.defineProperty(obj2,x,{
value:obj1.x,
})
</script>
|
数据代理在 Vue 中的应用

_data实际上里面为数据劫持
8.事件的基本使用
1
2
3
4
5
6
7
8
9
10
11
12
13
14
15
16
17
18
19
20
21
22
23
24
25
26
27
28
29
30
31
32
33
34
35
36
37
| <div id="root">
// 需要传参可以加括号 但是 event会消失 加入 $event Vue帮助传参
<button v-on:click="showInfo($event,66)">点我提示信息</button>
<a href="#" @click.prevent="methods">点我跳转</a> // 阻止跳转
</div>
<script>
x = new Vue({
el:'#root',
data:{
name:'尚硅谷',
},
methods:{
showInfo(event,number){
alert("同学你好" + number);
},
aClick(e){
e.preventDefault();
alert("同学你好")
}
}
})
</script>
|
9.键盘事件
1
2
3
4
5
6
7
8
9
10
11
12
13
14
15
16
17
18
19
20
21
22
23
24
25
26
27
28
29
30
31
32
33
34
|
<div id="root">
<h2>欢迎来到{{name}学习</h2>
<input type="text" placeholder="按下回车提示输入"@keyup.enter="showInfo">
</div>
<script type="text/javascript">
Vue.config.productionTip = false
new Vue({
el : "#root",
data:{
name:"尚硅谷"
},
methods:showInfo(e){
console.log(e.target.value)
},
})
</script>
1.Vue中常用的按赞别名:
回车 =>enter
删除=>delete(捕获“删除”和“退格”键)
退出=>esc
空格=>space
换行=>tab
上=>up
下=>down
左=>left
右=> right
2.Vue未提供别名的按健,可以使用按键原始的key值去绑定,但注意要转为kebab-case(短横线命名)
caps-lock 大小写键别名
3.系统修饰健(用法特殊): ctrl、alt、shift、meta(win)
(1).配合keyup使用:按下修饰键的同时,再按下其他键,随后释放其他键。事件才被触发。
(2).配合keydown使用:正常触发事件。
4.也可以使用keyCode去指定具休的按键(不推荐)
5.Vue.config.keyCodes.自定义健名=健码,可以去定制按健别名
|
/*
修饰符是可以连续使用的(链式调用)
- @click.prevent.top
- @keydown.alt.y /* y 与 alt 一起按下 */
*/
10.计算属性
1
2
3
4
5
6
7
8
9
10
11
12
13
14
15
16
17
18
19
20
21
22
23
24
25
26
27
28
29
30
31
32
33
34
35
36
37
38
39
40
41
42
43
44
45
46
47
48
49
50
51
52
53
54
55
56
57
| <div id="root">
<h2>欢迎来到{{name}}学习</h2>
// 模板中可以写一些简单的语句 但是不能写 Vm中没有的!
<h2>欢迎来到{{name = !name}}学习</h2>
<input type="text" placeholder="按下回车提示输入"@keyup.enter="showInfo">
</div>
<script type="text/javascript">
Vue.config.productionTip = false
new Vue({
el : "#root",
data:{
firstname:"尚硅谷",
lastname:"snowman",
},
methods:{
get(){
}
}
computed:{
fullname:{
get(){
return this.firstname + this.lastname;
set(value){
const arr = value.split('-');
this.firstname = arr[0];
this.lastname = arr[1];
}
}
fullname(){
return "小猪佩奇";
}
}
}
})
</script>
|
11.监视属性
1
2
3
4
5
6
7
8
9
10
11
12
13
14
15
16
17
18
19
20
| Vue ({
watch:{
isHot:{
immediate:true,
handler(newValue,oldValue){
console.log(newValue,oldValue);
}
}
}
})
vm.$watch('isHot',{
immediate:true,
handler(newValue,oldValue){
console.log(newValue,oldValue);
}
})
|
12.深度监视
1
2
3
4
5
6
7
8
9
10
11
12
13
14
15
16
17
18
19
20
21
22
23
24
25
26
27
28
29
30
31
32
33
34
35
36
37
38
39
40
41
42
|
Vue ({
data:{
number:{
a:500,
b:600,
},
name:'逯少',
}
watch:{
number:{
deep:true,
immediate:true,
handler(newValue,oldValue){
console.log(newValue,oldValue);
}
}
},
watch:{
name(){
console.log("name被改变了");
}
}
})
vm.$watch('isHot',fuction(){
console.log("isHot被改变了");
})
|
13.watch与computed对比
1
2
3
4
5
6
7
8
9
10
11
12
13
14
15
16
17
|
handler(){
setTimeout(()=>{
console.log("1s passing number改变了");
},1000)
}
|
14.修改/绑定 class
1
2
3
4
5
6
7
8
9
10
11
12
13
14
15
16
17
18
19
20
21
22
23
24
25
26
27
28
29
30
31
32
33
34
35
36
37
38
39
| Vue 会解析数组/对象 --> Js表达式
<div class="basic" :class="yourclass"></div><br/><br/>
<div class="basic" :class="list_arr"></div>
<div class="basic" :class="classObj"></div>
<div class="basic" :style="styleObj"></div>
---> 经过Vue解析之后会变成
<div class="basic normal"></div><br/><br/>
<div class="basic class1 class2 class3" :class="list_arr"></div>
<div class="basic class1 class3"></div>
<div class="basic" style="color:red;fontSize:10px;backgroundColir:grzy;"></div>
<script>
new Vue({
el:'#id',
data:{
yourclass:'normal',
list_arr:['class1','class2','class3'],
classObj:{
class1:true,
class2:false,
class3:true,
}
styleObj:{
color:red,
fontSize:10px,
backgroundColir:grzy,
}
}
})
</script>
|
15.条件渲染
1
2
3
4
5
6
7
8
9
10
11
12
13
14
15
16
17
18
19
20
|
“” 中填写 js 表达式
<div v-show="false">我的display属性为none</div>
<div v-show="true">我的display属性为默认</div>
<div v-if="false">我不会在DOM中出现</div>
<div v-else-if="false">我不会在DOM中出现</div>
<div v-else="false">我不会在DOM中出现</div>
<div v-if="true">我会在DOM中出现</div>
需要整体隐藏的时候 使用 template不会影响结构
div也可以 注意css
template 只能与 v-if 配合 v-show 会失效
<template v-if="表达式">
<h1>h1</h1>
<h1>h2</h1>
</template>
|
16.列表渲染 循环
1
2
3
4
5
6
7
8
9
10
11
12
13
14
15
16
17
18
19
20
21
22
23
24
25
26
27
28
29
30
31
32
33
34
35
36
37
38
| <div>
<ul>
<li v-for="p in persons" :key="p.id">{{p.id}}-{{p.name}}</li>
<li v-for="(p,index) in persons" :key="index">{{p.id}}-{{p.name}}</li>
<li v-for="(value,key) in Obj" :key="key">{{key}}-{{value}}</li>
</ul>
</div>
<script>
new Vue({
el:'#id',
data:{
persons:[
{id:"001", name:"001"},
{id:"002", name:"002"},
{id:"003", name:"003"},
]
Obj:{
name:"王二",
adress:"二仙桥",
}
}
})
</script>
|
17.循环 key详解
1
2
3
4
5
6
7
8
9
10
11
12
13
14
15
16
17
18
19
20
21
22
23
|
|
18.列表过滤 (搜索)
1
2
3
4
5
6
7
8
9
10
11
12
13
14
15
16
17
18
19
20
21
22
23
24
25
26
27
28
29
30
31
32
33
34
35
36
37
38
39
40
41
42
43
44
45
46
47
48
49
50
51
52
53
54
55
56
57
58
59
60
61
62
63
64
| <input v-model="keyWord" placeholder="请输入姓名">
<ul>
<li v-for="p in filterPersons" :key="p.id">{{p.id}}-{{p.name}}</li>
<button @click="sortType = 1">id降序</button>
<button @click="sortType = 0">原排序</button>
</ul>
<script>
new Vue({
el:'#id',
data:{
sortType:0,
keyWord:"",
persons:[
{id:"001", name:"001"},
{id:"002", name:"002"},
{id:"003", name:"003"},
{id:"004", name:"004"},
],
filterPersons:[],
},
watch:{
keyWords:{
immediate:true,
handler(val){
this.filterPersons = this.persons.filter((e)=>{
return p.name.indexOf(bal) !== -1;
})
}
}
},
computed:{
filterPersons:{
return this.persons.filter((p)=>{
return p.name.indexOf(this.keyWord) !== -1;
})
}
}
computed:{
filterPersons:{
const list = this.persons.filter((p)=>{
return p.name.indexOf(this.keyWord) !== -1;
})
if(this.sortType){
list.sort((p1.age,p2.age)=>{
return this.sortType === 1 ? p1.age-p2.age : p2.age-p1.age;
}
return list;
}
}
}
})
</script>
|
3.Vue检测数据的原理
19.Vue检测数据改变的原理
1
2
3
4
5
6
7
8
9
10
11
12
13
14
15
16
17
18
19
20
21
22
23
24
25
26
27
28
29
30
31
32
33
34
35
36
37
38
39
40
|
<script>
vm.persons[0] = {id:"001", name:"马老师", age:50};
vm.persons[0].name = "马老师";
vm.persons[0].age = 50;
</script>
<script>
get set 方法 在调用 对象时会自动被更改
data = {
name:"王二",
age:18,
}
const obs = new Observer(data)
console.log(obs)
function observer(obj){
const keys = object.keys(obj)
keys.forEach((k)=>{
object.defineProperty(this,k,{
get(){
return obj[k]
},
set(val){
obj[k] = val
}
</script>
!!!!!! 检测原理就是使用setter 考虑非常周到!递归数组都能检测!!!
|
20.vue.set 添加响应式属性
1
2
3
4
5
6
7
8
9
10
11
12
13
|
Vue.set(target,key,value)
Vue.set(vm.student,"name","王二")
Vue.set(vm._data.student,"name","王二")
vm.$set(vm.student,"name","王二")
vm.$set(vm._data.student,"name","王二")
|
21.Vue检测数组
1
2
3
4
5
6
7
8
9
10
11
12
13
14
|
vm.data.student.hobby.push === Array.prototype.push
>>> false
|
总结
1
2
3
4
5
6
7
8
9
10
11
12
13
14
15
16
17
18
19
|
|
4.收集表单数据
5.过滤器
day.js 库可以格式化时间
在BootCDN可以查询到开源的所有库
1
2
3
4
5
6
7
8
9
10
11
12
13
14
15
16
| 过滤器 可以在 v-bind 与 插值语法中使用
<h3>现在是: {{time | timeFormater() | otherFilters()}}</h3>
<script>
Vue.filter("mySlice",fuction(){
return "过滤后的内容"
})
var vm = new Vue({
filters:{
timeFormater(value){
return "value为传入time的值 返回值作为 表达式展示的值"
}
}
})
</script>
|
6.Vue指令汇总
1
2
3
4
5
6
7
8
9
10
11
12
13
14
15
16
17
18
19
20
21
22
23
24
25
26
27
28
29
30
31
32
33
34
35
36
37
38
39
40
41
42
43
44
45
46
47
48
49
50
51
52
53
|
<style>
[v-cloak]{
display:none;
}
</style>
|
7.Vue自定义指令
7.1函数式
1
2
3
4
5
6
7
8
9
10
11
12
13
14
15
16
17
18
19
20
21
| n放大十倍之后的值为:
<span v-big="n"> </span>
<input v-bind:value="n">
<script>
new Vue({
directives:{
big(element,binding){
element.innerText = binding.value * 10;
element.fouce();
}
}
})
</script>
|
7.2对象式
1
2
3
4
5
6
7
8
9
10
11
12
13
14
15
16
17
18
19
20
| <input v-fbind:value="n">
<script>
new Vue({
directives:{
fbind:{
bind(){
},
inserted(){
},
update(){
},
}
}
})
</script>
|
7.3小总结
1
2
3
4
5
6
7
8
9
| 注意: 命名时尽量不要用大写字母 Vue 会将大写字母 解析成小写字母
v-set-member ---> `set-member`(){}
<script>
Vue.directive('big',{
...
})
</script>
|
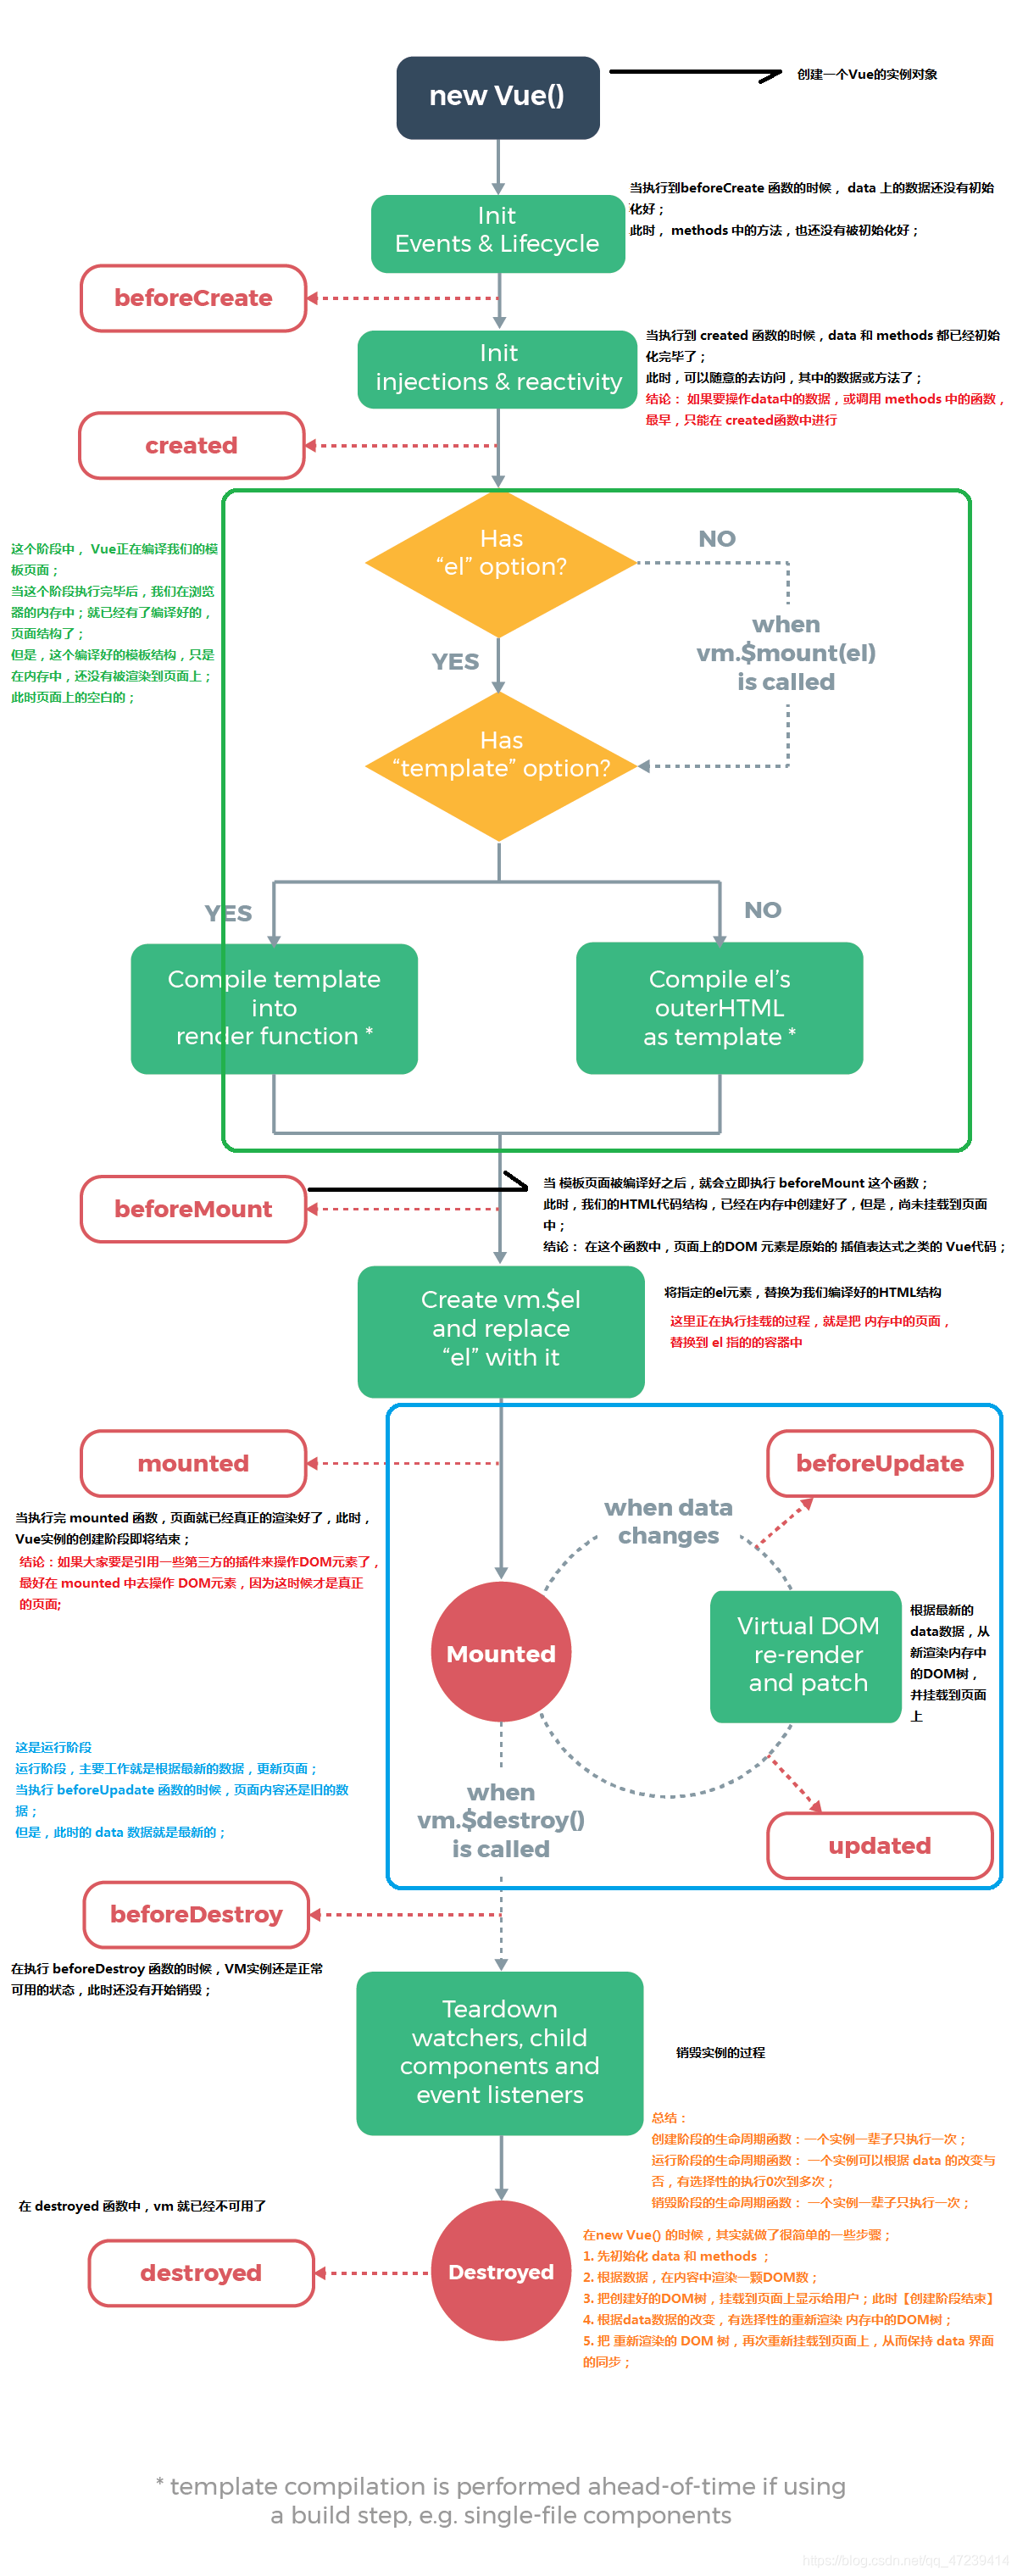
8.生命周期函数
8.1 mounted介绍
1
2
3
4
5
6
7
8
9
10
11
12
13
14
15
16
17
18
19
20
21
22
23
24
25
26
27
28
29
30
31
32
33
| // 动态绑定数据需要写成对象的形式
<h2 style="{opacity: opacity}"> 我会变化透明度 </h2>
// 属性值与键名重复时可简写
<h2 style="{opacity}"></h2>
<script>
new Vue({
data:{
opacity:1,
},
methos:{
change(){
setInterval(()=>{
this.opacity -= 0.01;
if(this.opacity <= 0) this.opacity = 1;
},16)
}
},
mounted(){
setInterval(()=>{
this.opacity -= 0.01;
if(this.opacity <= 0) this.opacity = 1;
},16)
}
})
</script>
|
8.2挂载流程
1
2
3
4
5
6
7
8
9
10
11
12
13
14
15
16
17
18
19
20
21
22
23
24
25
26
| <script>
new Vue({
tmplate:`在此处可以写 HTML 语法 替换模板`
beforeCreate(){}
created(){}
beforeMount(){}
mounted(){}
})
</script>
|
8.3更新流程:
1
2
3
4
5
6
7
8
9
| new Vue({
beforeUpdate(){}
updated(){}
})
|
8.4销毁流程
1
2
3
4
5
6
7
8
9
10
11
|
new Vue({
beforeDestory(){}
destoryed(){}
})
|

9.组件化 !!!
定义:现实应用中局部功能代码和资源的集合
非单文件组件∶
一个文件中包含有n个组件。
单文件组件∶
一个文件中只包含有1个组件。
1.非单文件组件
1.非单文件组件
1
2
3
4
5
6
7
8
9
10
11
12
13
14
15
16
17
18
19
20
21
22
23
24
25
26
27
28
29
30
31
32
33
34
35
36
37
38
|
const school = Vue.extend({
data:fouction(){
return {...}
}
template:`
HTML 内容
`
})
new Vue({
el:"#root",
components:{
xuexiao:school,
school:school,
school
}
})
|
注意点
1
2
3
4
5
6
7
8
9
10
11
12
13
14
15
16
17
18
19
20
21
|
|
2.组件的嵌套
1
2
3
4
5
6
7
8
9
10
11
12
13
14
15
16
17
|
const school = Vue.extends({
template:"...",
compoent:{
scool,
"..."
}
})
const student = Vue.extends({
template:"...",
components:{
scool,
"..."
}
})
|
3. Vue Compoent构造函数
1
2
3
4
5
6
7
8
9
10
11
12
13
14
15
16
17
| vm 实例中 包含 $children 为数组 数组中包含着 VueComponent 对象
VueComponent 中 的成员变量以及方法与 vm 一致
组件: 不可使用 el data 只能使用函数式
|
4.重要的内置关系
Vue 与 VueComponent 的关系

2.单文件组件
{webpack, 脚手架} 编译使用 .vue后缀

App结构
安装 VSCODE vue 插件 后 输入 <v tab键就可自动补全

main.js


 大三萌新 热爱前端一起学习 共同进步Ctrl+D 收藏我吧


